A friend wanted a week-at-a-glance calendar to keep track of all her family's weekly activities. Between three children in a combination of sports, scouts, study sessions, play dates, and church activities she was starting to feel overwhelmed. Add to that her exercise classes, book club, and volunteer work, and her husband's (random) part time job and it was getting a little impossible to keep track of who was supposed to be where on what day.
I suggested a dry erase frame. I have a 16x20 inch frame with a vinyl calendar grid. Every family member has their own color, so I can easily see the week's events:
I also have an 11x14 inch frame in my kitchen for menu planning. Whereas my calendar has no backing (the glass is glued to the frame), I chose to frame some colorful fabric. I also added chipboard letters, buttons, and homemade fabric flowers to dress it up. Unfortunately I just realized I do not have a final picture with my lettering, I added the days of the week in a dark turquoise color.
My friend opted for a cute idea she found online, and I absolutely adore it! She picked out a frame with seven openings and asked for colorful paper and vinyled days of the week. It came out super cute. I think this idea would be equally cute for a menu board, or with each window having a name of a family member rather than a week day. I have also seen seven windowed frame collages arranged as clusters rather than in a row so don't let this large frame scare you. Here are the before and after pictures:
Green template
Thank you so much for stopping by Toadilly Homemade! This is a place where I try to capture my favorite crafting projects. I love to create and I hope you find something that inspires you.
9.06.2012
9.05.2012
Wedding Tile
I made this as a gift for a very special young woman I had the privilege of teaching at church. She has grown in to a strong, smart, incredible woman. I am so happy she has found a wonderful man to love and cherish her! I selected colors based on her reception colors of royal blue and silver. I also know she loves so I added some pearls. I wish them much love and joy as they begin their journey together!!
8.31.2012
Olympic Fever!
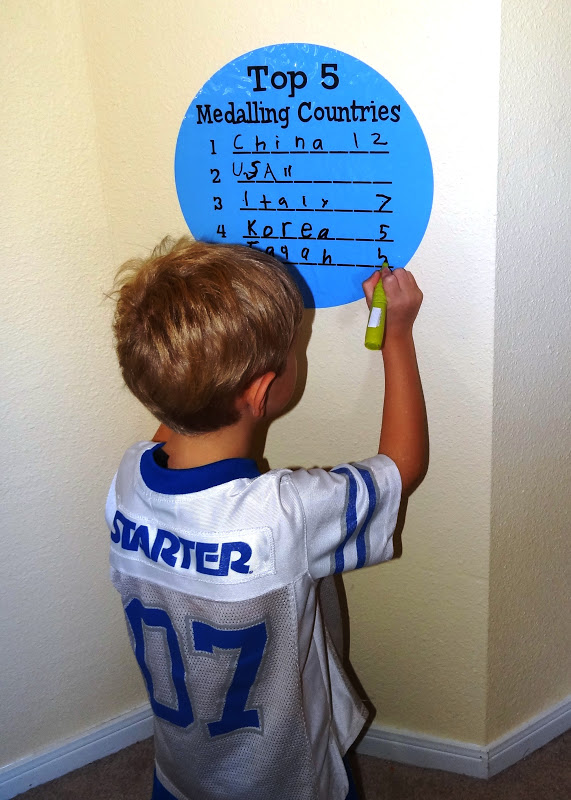
I have a sports nut. He loves pretty much every sport. He loves to compete. He races home from the bus every day, he just doesn't know that no one is racing with him. :) My son is also extremely patriotic. He asks for the Star Spangled Banner as one of his nightly bedtime songs. I knew the Olympics would be a huge hit with him, and a great way to show American pride and learn more about other countries around the world.
To celebrate the the Olympic event I hung a huge world map in our hallway. And then I spiced up our experience with some vinyl. I cut colored rings to recreate the Olympic rings on my wall. Next I cut two large circles out of dry erase vinyl. On those I added lettering so that we could keep track of the USA medal count (gold, silver, and bronze) and the list of the top five medalling countries.
8.13.2012
Pokemon Party!
I purchased a bright yellow tablecloth. I hunted online for free Pikachu coloring pages, and turned those pages in to cutting files. I cut a black outline of the creature and some red facial highlights, then applied them to the tablecloth. It wasn't easy, the tablecloth was a bit slippery. But the end product totally rocked! And my son absolutely loved it!!
I also decided to create a simple game of pin the tail on Pikachu. I spent less than a dollar for a sheet of white poster board. This time I cut a black under layer, a yellow body, and red facial highlights. I applied all pieces except for Pikachu's tail. I cut several yellow tails out of vinyl to use for the game.
The game was hilarious fun! We loved blindfolding the boys and making them insanely dizzy. In the end both of the older boys did get fairly close, but we also had some stray tails end up on the stairs and a neighboring chest.
Now I am excited to start working on an adorable two year old's Mickey Mouse birthday!!!
7.29.2012
Texas Star Baby Album
I don't usually highlight my passion for scrapbooking. But last week I made a baby scrapbook for a dear friend expecting the arrive of a little boy in two weeks. I went with a cowboy theme to match her nursery, and I absolutely love how it came out! So please excuse a little bit of paper bragging. :)
The little boy's name will be Clayton Levi. Her baby shower thus had a blue jean cowboy theme. When I found the blue jean album at the store I knew I just HAD to make a batching album. While we were hunting for decor ideas, I noticed my friend had saved a few links for creating rope names on Pinterest. That was my inspiration for the cover.
This is the first page. I decided on the title "Wanted" because my friend has struggled with infertility and because she had to fight daddy for a long time for her name choice. :)
I really love the top left page, which is meant for her ultrasound pictures. The lettering reads, "It's a cowBOY!!" The bottom pages have an over sized sheriff star. I tried to incorporate stars on several pages.
I really love these next pages, these two pages will help her record memories from Clayton's baby blessing. The pendant on the left page was made from scraps from the large blue jean and burlap pendant banner I made for the baby shower. Maybe I will throw in a picture of the banner at the end, after all I did use vinyl to create it. :)
The next four pages highlight Clayton's new family. The left page will display pictures of mom and dad, and the right page will show off Clayton's cute cowgirl sister.
The final pages are unthemed pages. I didn't know what memories my friend would want to capture (firsts? a page for each month?). I didn't want to push her in any particular direction.
And now as promised, here are a few pictures of the large banner I made for the baby shower. Unfortunately I don't have a great shot of it at the party. These are a few close up shots I took from home. The triangles are cut from denim cotton and beige burlap. The letters and sheriff stars are vinyl. The pendants were strung on twine and strips of red bandanna fabric were tied between the pendants for an extra pop of color.
Happy trails!! :)
The little boy's name will be Clayton Levi. Her baby shower thus had a blue jean cowboy theme. When I found the blue jean album at the store I knew I just HAD to make a batching album. While we were hunting for decor ideas, I noticed my friend had saved a few links for creating rope names on Pinterest. That was my inspiration for the cover.
This is the first page. I decided on the title "Wanted" because my friend has struggled with infertility and because she had to fight daddy for a long time for her name choice. :)
I really love the top left page, which is meant for her ultrasound pictures. The lettering reads, "It's a cowBOY!!" The bottom pages have an over sized sheriff star. I tried to incorporate stars on several pages.
I really love these next pages, these two pages will help her record memories from Clayton's baby blessing. The pendant on the left page was made from scraps from the large blue jean and burlap pendant banner I made for the baby shower. Maybe I will throw in a picture of the banner at the end, after all I did use vinyl to create it. :)
The next four pages highlight Clayton's new family. The left page will display pictures of mom and dad, and the right page will show off Clayton's cute cowgirl sister.
The final pages are unthemed pages. I didn't know what memories my friend would want to capture (firsts? a page for each month?). I didn't want to push her in any particular direction.
And now as promised, here are a few pictures of the large banner I made for the baby shower. Unfortunately I don't have a great shot of it at the party. These are a few close up shots I took from home. The triangles are cut from denim cotton and beige burlap. The letters and sheriff stars are vinyl. The pendants were strung on twine and strips of red bandanna fabric were tied between the pendants for an extra pop of color.
Happy trails!! :)
4.02.2012
One more Disney Post
Forgive me for throwing my fabulous vacation in the mix again, but I have a few more vinyled items I can show for inspiration.
The first things I can show you are handmade T-shirts and pillowcases. I wanted my kids to help make some fun items for their trip. We bought colorful T-shirts and covered them in various sizes of Mickey heads. Then we sprayed them with bleach and let them sit in the sun. Once the shirts were dry we washed them and peeled off the vinyl to reveal a custom faded/bleached shirt with dark Mickey heads. Here is a shot of my boys spraying their shirts:
Unfortunately I do not have a close up shot of the finished product. My boys wore their shirts to our character breakfast, and if you look really close you can at least get a feel for how the shirts turned out.
We repeated the process for two pillowcases as well. I did decide to add an initial so my boys would be able to identify their own personal pillowcase. Once we boarded our ship we turned the pillowcases in to the 'front desk' of the ship with a Sharpie marker. They were returned to our cabin three days later with signatures from all the main Disney characters! It was a fantastic souvenir!
The last items I created were luggage tags. I found colorful leather luggage tags at Michaels for $1 each. The tags had a pocket for a picture. I selected appropriate scrapbook paper as the picture, and added a few accents on the plastic window to add even more cute factor. I used some stickers and Mickey heads cut from vinyl. This was a useful touch for our trip since we had multiple matching bags. I will likely recycle some of these tags for my boys' backpacks this school year.
The first things I can show you are handmade T-shirts and pillowcases. I wanted my kids to help make some fun items for their trip. We bought colorful T-shirts and covered them in various sizes of Mickey heads. Then we sprayed them with bleach and let them sit in the sun. Once the shirts were dry we washed them and peeled off the vinyl to reveal a custom faded/bleached shirt with dark Mickey heads. Here is a shot of my boys spraying their shirts:
Unfortunately I do not have a close up shot of the finished product. My boys wore their shirts to our character breakfast, and if you look really close you can at least get a feel for how the shirts turned out.
We repeated the process for two pillowcases as well. I did decide to add an initial so my boys would be able to identify their own personal pillowcase. Once we boarded our ship we turned the pillowcases in to the 'front desk' of the ship with a Sharpie marker. They were returned to our cabin three days later with signatures from all the main Disney characters! It was a fantastic souvenir!
The last items I created were luggage tags. I found colorful leather luggage tags at Michaels for $1 each. The tags had a pocket for a picture. I selected appropriate scrapbook paper as the picture, and added a few accents on the plastic window to add even more cute factor. I used some stickers and Mickey heads cut from vinyl. This was a useful touch for our trip since we had multiple matching bags. I will likely recycle some of these tags for my boys' backpacks this school year.
3.28.2012
Fish Extenders
I am a Disney fan. Not over the top obsessed mind you, but I grew up close to Disneyland and visited the park at least every other year. It is a magical place. So during the past year I got the idea in my head that I wanted to have my boys experience the Disney magic. I started to plan a trip to Disney World. Then I got my hubby involved and he talked me in to switching to a Disney cruise. The announcement to the boys was made Christmas morning and we took our trip over spring break. It was fantastic fun!
While planning our trip I learned of a fun game Disney cruisers like to play. It is a gift exchange called "Fish Extenders" or "FE" for short. Families sign up to participate in the voluntary exchange and leave gifts for each other throughout the cruise. Naturally when I was choosing my gift, it HAD to involve vinyl and a crafty flare. :)
Each person on the gift exchange received a pocket sized bottle of hand sanitizer with a Mickey Mouse hand vinyled on it. They turned out adorable! And each person also received two black tile magnets, one with a Disney or cruise symbol and one personalized with their initial. They were meant to help decorate their cabin doors which are magnetic. Here are the pictures of my handiwork. Enjoy!
While planning our trip I learned of a fun game Disney cruisers like to play. It is a gift exchange called "Fish Extenders" or "FE" for short. Families sign up to participate in the voluntary exchange and leave gifts for each other throughout the cruise. Naturally when I was choosing my gift, it HAD to involve vinyl and a crafty flare. :)
Each person on the gift exchange received a pocket sized bottle of hand sanitizer with a Mickey Mouse hand vinyled on it. They turned out adorable! And each person also received two black tile magnets, one with a Disney or cruise symbol and one personalized with their initial. They were meant to help decorate their cabin doors which are magnetic. Here are the pictures of my handiwork. Enjoy!
Subscribe to:
Posts (Atom)